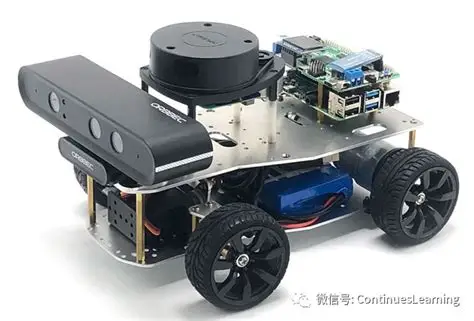
T265和D435联合使用

T265和D435联合使用
AyaT265 和 D435 联合使用
安装 ROS
请参考 于 orangepi5 plus 上部署 ros1
和 Acfly 相关库的安装
换源
一般对 etc/apt/source.list 进行换源:
1
sudo vim /etc/apt/sources.list
对 pip 进行换源:
换清华源1
pip3 config set global.index-url https://pypi.tuna.tsinghua.edu.cn/simple
部分 python 库清华源中没有, 或没有需要的版本, 或下载库下载失败时, 可以使用其他的镜像源:
1
pip3 install 需要下载的库==版本号 -i 镜像源地址
下为其他镜像源地址:
华为:https://mirrors.huaweicloud.com/repository/pypi/simple
阿里云:http://mirrors.aliyun.com/pypi/simple/
清华:https://pypi.tuna.tsinghua.edu.cn/simple/
中国科技大学:https://pypi.mirrors.ustc.edu.cn/simple/
华中理工大学:http://pypi.hustunique.com/
山东理工大学:http://pypi.sdutlinux.org/
豆瓣:http://pypi.douban.com/simple/
其中,清华源最稳定,华为源最新,中科大源也好用。
科学上网
学校校园网 git clone 很容易出现网络问题,需要在板载上跑自己电脑的梯子。
1
2
3
4
5
6
# 自己电脑的ip:自己梯子开的端口号,默认是7890
export http_proxy=http://192.168.1.25:7890
export https_proxy=https://192.168.1.25:7890
# 记得将自己的梯子的允许局域网打开
# 没有梯子的话可以去搞个精灵学院的 60R 还是 68R 的 400G 流量梯子, 比按月计费的好
# 400G 足够用好几年了后续编译 ros 工作空间时, 在编译 SDK 时会用到 git clone , 因此强烈建议给板载挂上梯子再进行环境配置!!!
没挂梯子会导致编译完成后 ros 无法识别 T265 和 D435 !
没挂梯子会导致编译完成后 ros 无法识别 T265 和 D435 !
没挂梯子会导致编译完成后 ros 无法识别 T265 和 D435 !
SDK
安装 realsense_ros
1 | git clone -b ros1-legacy https://github.com/IntelRealSense/realsense-ros.git |
安装 T265 和坐标转换的工具包
1 | # 进到自己创建的acfly_ws工作空间下 |
如果选择的是 v2.53.1 或其他版本
则需要修改 /realsense_ros/realsense2_camera 中的 CMakeLists.txt
版本号要对应,否则会报错!
1 | # 于43行处找到 find_package(realsense2 2.50.0) |
注意!!!!
- 从 Intel® RealSense™ SDK 2.0 (v2.54.1) 中已经明确说明版本不再支持 T265 最后一个支持的版本为 v2.50.0 ,而期间的几个版本虽然支持 T265 但官方说明不在对其进行测试。
其最新版v2.55.1在 ros 中用 T265 和 D435 构建三维 SLAM 图会直接崩溃, v2.53.1及以下则需要将 ros 中关于 D435 的 launch 中将 color_fps 调为 15 或 6。
即 /acfly/src/realsense_ros/realsense2_camera/launch 中的 D435 相关 launch, 这里以 ./rs_d400_and_t265.launch 为例:
1 | <group ns="$(arg camera2)"> |
- T265 和 D435 于 orangepi5 plus 板载上无法使用其官方自带的 python api 库进行调用部分图像:
T265 鱼眼图, D435 无法调用于彩色图相关的任何图像, 但能调用红外灰度图。
要调用 T265 或 D435 的彩色图或鱼眼图, 请在 python 中使用多线程订阅 ros 发布的图像消息, 或者使用 C++ 进行调用。
使用多线程请务必使用 global 将获取的图像设为全局变量, 并使用 flag 标志位来进行判断图像是否获取到, 下面会有具体案例。
T265 和 D435 于 rospy 中的使用
D435 在 orangepi5 plus 中使用 python 调用彩色流的方法
首先,需要确保其 .py 文件处于 acfly_ws 工作空间下的功能包内。
例如: ~/acfly_ws/scr/vision_to_mavros/scripts/name.py如果需要指定其使用的环境,请于文件开头添加:
1
2
3
4
5
6#!/usr/bin/env python3
import os
venv_path = '/home/orangepi/python_ven/rknn'
os.environ['PATH'] = os.path.join(venv_path, 'bin') + ':' + os.environ['PATH']
os.environ['PYTHONPATH'] = os.path.join(venv_path, 'lib/python3.8/site-packages') + ':' + os.environ.get('PYTHONPATH','')具体实现:
1
2
3
4
5
6
7
8
9
10
11
12
13
14
15
16
17
18
19
20
21
22
23
24
25
26
27
28
29
30
31
32
33
34
35
36
37
38
39
40
41
42
43
44
45
46
47
48
49
50
51
52
53
54
55
56
57
58
59
60
61
62
63
64
65
66
67
68
69
70
71
72
73
74
75
76
77
78
79
80
81
82
83
84
85
86
87
88
89
90
91
92
93
94
95
96
97
98
99
100
101
102
103
104
105
106
107
108
109
110
111
112
113
114
115
116
117
118
119
120
121
122
123
124
125
126
127
128
129
130
131
132
133
134import sys
import time
import cv2
import numpy as np
from math import *
from sympy import *
import pyrealsense2 as rs
import math
import threading
import rospy
from nav_msgs.msg import Odometry
from sensor_msgs.msg import Image
from sensor_msgs.msg import CameraInfo
from cv_bridge import CvBridge
def call_rosspin():
print ('call_rosspin: running rosspin')
rospy.spin()
def callback_color(data):
global color_img, flag_im
color_img = bridge.imgmsg_to_cv2(data, "bgr8")
flag_im = True
def callback_depth(depth_img_msg):
global depth_img, flag_de
depth_img = np.copy(bridge.imgmsg_to_cv2(depth_img_msg, "passthrough"))
flag_de = True
# 上述为通过 ros 获取 D435 的彩色流和已经对齐彩色流的深度流
def find_largest_contour(contours, min_area, area_threshold=100):
areas = [(cv2.contourArea(c), c) for c in contours if cv2.contourArea(c) > min_area]
areas.sort(key=lambda x: x[0], reverse=True) # 按面积降序排序
largest_contour = areas[0][1] if len(areas) > 0 else None
second_largest_contour = None
if len(areas) > 1:
largest_area = areas[0][0]
second_area = areas[1][0]
# 判断面积差距
if abs(largest_area - second_area) > area_threshold:
second_largest_contour = None
else:
second_largest_contour = areas[1][1]
return largest_contour, second_largest_contour
# 要运行的代码请写在多线程中,虽然 python 多线程是假的()
def demo():
global color_img, flag_im, depth_img, flag_de
while not rospy.is_shutdown():
if flag_im: # 检查是否有新图像
# 重置标志
flag_im = False
color_img_filtered = np.zeros_like(color_img)
depth_img_c = np.copy(depth_img)
try:
# 除去远处的图像
depth_img_c[depth_img_c > max_distance * 1000] = 0
mask = depth_img_c > 0
color_img_filtered[mask] = color_img[mask]
#滤波识别图像
hsv = cv2.cvtColor(color_img_filtered, cv2.COLOR_BGR2HSV)
mask_red = cv2.inRange(hsv, red_lower, red_upper)
closing_r = cv2.morphologyEx(mask_red, cv2.MORPH_CLOSE, kernel)
opening_r = cv2.morphologyEx(closing_r, cv2.MORPH_OPEN, kernel)
contours_r, _ = cv2.findContours(opening_r, cv2.RETR_EXTERNAL, cv2.CHAIN_APPROX_SIMPLE)
largest_contour_r, _ = find_largest_contour(contours_r, min_area)
if largest_contour_r is not None:
M = cv2.moments(largest_contour_r)
x, y, w, h = cv2.boundingRect(largest_contour_r)
if M["m00"] > 0:
cv2.rectangle(color_img, (x, y), (x + w, y + h), (0, 255, 0), 2)
# 中心坐标
center_x_r = int(M["m10"] / M["m00"])
center_y_r = int(M["m01"] / M["m00"])
red_center = [center_x_r, center_y_r]
# r_h_up = [center_x_r, y + h]
# h_up = r_h_up
# r_h_down = [center_x_r, y]
# h_down = r_h_down
# # 深度
# depth_r = depth_img[y:y+h, x:x+w]
# depth_r = depth_r[(depth_r > 0) & (depth_r < 3000)]
# min_depth_r = int(np.max(depth_r))
# h_r = h
except: # 未找到色块
red_center = None
cv2.imshow('frame', color_img)
cv2.waitKey(1)
red_lower = np.array([156, 43, 46])
red_upper = np.array([180, 255, 255])
# 串口
dev = '/dev/ttyS3'
if __name__ == '__main__':
# 初始化飞机
time.sleep(20)
acfly = Acfly(dev)
bridge = CvBridge()
# 初始化ros节点 获取msg
rospy.init_node('acfly', anonymous=True)
msg_sub = rospy.Subscriber('/camera/odom/sample', Odometry, callback, queue_size=10)
color_sub = rospy.Subscriber("/d400/color/image_raw", Image, callback_color, queue_size=10)
death_sub = rospy.Subscriber("/d400/aligned_depth_to_color/image_raw", Image, callback_depth, queue_size=10)
# 创建线程
thread = threading.Thread(target=call_rosspin)
demo = threading.Thread(target=demo)
# 启动线程
send.start()
demo.start()注意!
rknn.api 和 ros 无法同时在同一个 python 文件中使用。
需要在使用 ros 的同时使用 rknn.api 的话,
未完待续……(没有后续了,懒得写了)